傳輸對像模式
傳輸對像模式(Transfer Object Pattern)用於從客戶端向服務器一次性傳遞帶有多個屬性的數據。 傳輸對像也被稱為數值對象。 傳輸對像是一個具有getter/setter 方法的簡單的POJO 類,它是可序列化的,所以它可以通過網絡傳輸。 它沒有任何的行為。 服務器端的業務類通常從數據庫讀取數據,然後填充POJO,並把它發送到客戶端或按值傳遞它。 對於客戶端,傳輸對像是只讀的。 客戶端可以創建自己的傳輸對象,並把它傳遞給服務器,以便一次性更新數據庫中的數值。 以下是這種設計模式的實體。
- 業務對象(Business Object) -為傳輸對象填充數據的業務服務。
- 傳輸對象(Transfer Object) -簡單的POJO,只有設置/獲取屬性的方法。
- 客戶端(Client) -客戶端可以發送請求或者發送傳輸對像到業務對象。
實現
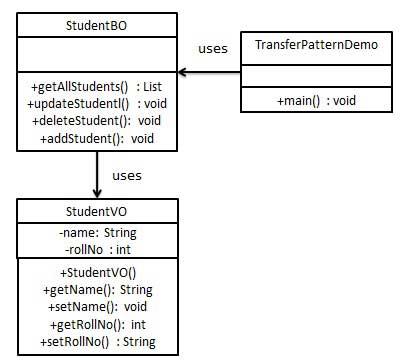
我們將創建一個作為業務對象的StudentBO和作為傳輸對象的StudentVO ,它們都代表了我們的實體。
TransferObjectPatternDemo,我們的演示類在這裡是作為一個客戶端,將使用StudentBO和Student來演示傳輸對象設計模式。
步驟1
創建傳輸對象。
StudentVO.java
public class StudentVO {
   private String name;
   private int rollNo;

   StudentVO(String name, int rollNo){
      this.name = name;
      this.rollNo = rollNo;
   }

   public String getName() {
      return name;
   }

   public void setName(String name) {
      this.name = name;
   }

   public int getRollNo() {
      return rollNo;
   }

   public void setRollNo(int rollNo) {
      this.rollNo = rollNo;
   }
}
步驟2
創建業務對象。
StudentBO.java
import java.util.ArrayList;
import java.util.List;

public class StudentBO {

   //列表是當作一個數據庫List<StudentVO> students;

   public StudentBO(){
      students = new ArrayList<StudentVO>();
      StudentVO student1 = new StudentVO("Robert",0);
      StudentVO student2 = new StudentVO("John",1);
      students.add(student1);
      students.add(student2);
   }
   public void deleteStudent(StudentVO student) {
      students.remove(student.getRollNo());
      System.out.println("Student: Roll No "
      + student.getRollNo() +", deleted from database");
   }

   //從數據庫中檢索學生名單public List<StudentVO> getAllStudents() {
      return students;
   }

   public StudentVO getStudent(int rollNo) {
      return students.get(rollNo);
   }

   public void updateStudent(StudentVO student) {
      students.get(student.getRollNo()).setName(student.getName());
      System.out.println("Student: Roll No "
      + student.getRollNo() +", updated in the database");
   }
}
步驟3
使用StudentBO來演示傳輸對象設計模式。
TransferObjectPatternDemo.java
public class TransferObjectPatternDemo {
   public static void main(String[] args) {
      StudentBO studentBusinessObject = new StudentBO();

      //輸出所有的學生for (StudentVO student : studentBusinessObject.getAllStudents()) {
         System.out.println("Student: [RollNo : "
         +student.getRollNo()+", Name : "+student.getName()+" ]");
      }

      //更新學生StudentVO student =studentBusinessObject.getAllStudents().get(0);
      student.setName("Michael");
      studentBusinessObject.updateStudent(student);

      //獲取學生studentBusinessObject.getStudent(0);
      System.out.println("Student: [RollNo : "
      +student.getRollNo()+", Name : "+student.getName()+" ]");
   }
}
步驟4
驗證輸出。
Student: [RollNo : 0, Name : Robert ]
Student: [RollNo : 1, Name : John ]
Student: Roll No 0, updated in the database
Student: [RollNo : 0, Name : Michael ]