Django create your first project
In this chapter we will introduce management tools and how to use Django Django to create a project, the first project to command our HelloWorld project.
Django management tools
After you install Django, you should now have available management tools django-admin.py. Django-admin.py we can use to create a project:
We can look at django-admin.py command description:
[root@solar ~]# django-admin.py
Usage: django-admin.py subcommand [options] [args]

Options:
  -v VERBOSITY, --verbosity=VERBOSITY
                        Verbosity level; 0=minimal output, 1=normal output,
                        2=verbose output, 3=very verbose output
  --settings=SETTINGS   The Python path to a settings module, e.g.
                        "myproject.settings.main". If this isn't provided, the
                        DJANGO_SETTINGS_MODULE environment variable will be
                        used.
  --pythonpath=PYTHONPATH
                        A directory to add to the Python path, e.g.
                        "/home/djangoprojects/myproject".
  --traceback           Raise on exception
  --version             show program's version number and exit
  -h, --help            show this help message and exit

Type 'django-admin.py help <subcommand>' for help on a specific subcommand.

Available subcommands:

[django]
    check
    cleanup
    compilemessages
    createcachetable
……省略部分……
Creating your first project
Django-admin.py use to create the HelloWorld project:
django-admin.py startproject HelloWorld
Once created, we can view the directory structure of the project:
[root@solar ~]# cd HelloWorld/
[root@solar HelloWorld]# tree
.
|-- HelloWorld
|   |-- __init__.py
|   |-- settings.py
|   |-- urls.py
|   `-- wsgi.py
`-- manage.py
Directory Description:
- HelloWorld: container of your project.
- manage.py: a useful command-line tool that allows you a variety of ways to interact with this Django project.
- HelloWorld / __ init__.py: An empty file that tells Python that directory is a Python package.
- HelloWorld / settings.py: Settings of the Django project / configuration.
- HelloWorld / urls.py: URL declare the Django project; a drive from the Django website "directory."
- HelloWorld / wsgi.py: a WSGI compliant inlet Web server to run your project.
Next we enter HelloWorld directory, enter the following command to start the server:
python manage.py runserver 0.0.0.0:8000
0.0.0.0 allow other computers can connect to the development server, port number 8000. Without explanation, the default port number 8000.
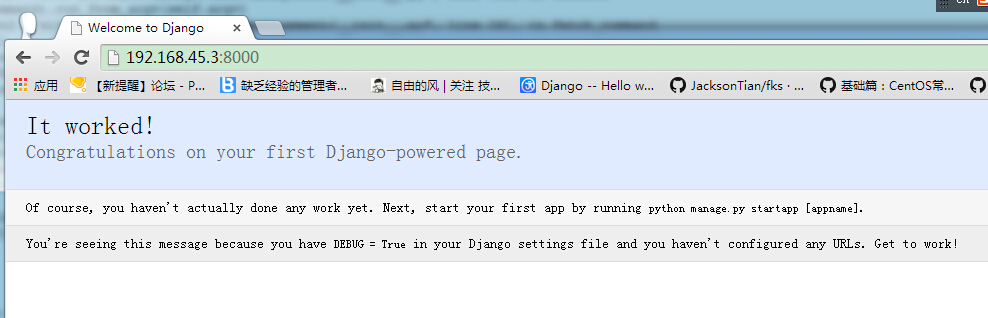
In your browser and enter your server's ip and port number, if the normal start, the output results are as follows:
View and configure URL
HelloWorld HelloWorld directory in the directory previously created under a new view.py file, and enter the code:
from django.http import HttpResponse

def hello(request):
	return HttpResponse("Hello world ! ")
Next, the binding URL and view functions. Open urls.py file, delete the original code, copy the following code into urls.py file:
from django.conf.urls import *
from HelloWorld.view import hello

urlpatterns = patterns("",
	('^hello/$', hello),
)
The entire directory structure is as follows:
[root@solar HelloWorld]# tree
.
|-- HelloWorld
|   |-- __init__.py
|   |-- __init__.pyc
|   |-- settings.py
|   |-- settings.pyc
|   |-- urls.py              # url 配置
|   |-- urls.pyc
|   |-- view.py              # 添加的视图文件
|   |-- view.pyc             # 编译后的视图文件
|   |-- wsgi.py
|   `-- wsgi.pyc
`-- manage.py
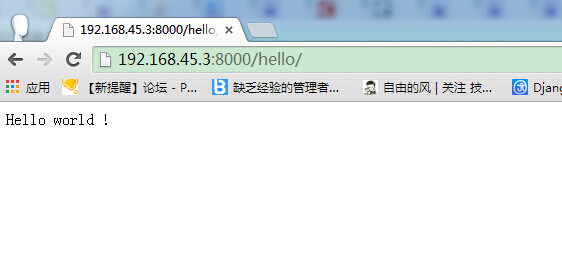
When finished, start the Django development server, open a browser and access the browser and go to:
Note: If the code in the project there are changes, the server will automatically monitor changes to the code and automatically reloads, so if you have started the server is not required to manually restart.