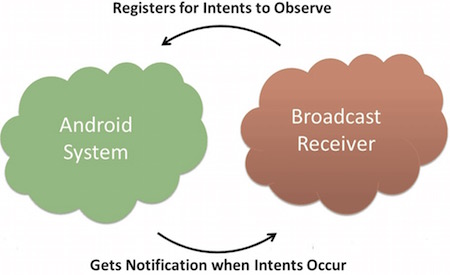
안드로이드 방송 수신부 (방송 수신기)
다른 애플리케이션 또는 시스템에 대한 브로드 캐스트 메시지에 응답하여 방송 수신기. 이 메시지는 때로는 사건이나 의도라고합니다. 예를 들어, 애플리케이션은 다른 애플리케이션이 데이터의 일부가 장치에 다운로드 된 안내 할 수 있도록 브로드 캐스트를 개시 할 수 있으며 이용할 수있다. 이러한 방송 수신기는 이러한 통신을 차단하기 위해 적절한 조치를 정의 할 수 있습니다.
작동하는 방송 수신기 방송 시스템의 의도를 만드는 두 가지 중요한 단계가 있습니다.
- 방송 수신기 만들기
- 등록 된 방송 수신기
사용자 지정의 목적을 달성하기 위해 추가 단계가 있습니다, 당신은 만들고 이러한 의도를 방송한다.
방송 수신기 만들기
방송 수신기는 브로드 캐스트 리시버의 서브 클래스로서 구현 및 방법은 상기 메시지의 파라미터로서 텐트 오브젝트를 수신한다 () onReceive 재정의 될 필요가있다.
public class MyReceiver extends BroadcastReceiver {
   @Override
   public void onReceive(Context context, Intent intent) {
      Toast.makeText(context, "Intent Detected.", Toast.LENGTH_LONG).show();
   }
}
등록 된 방송 수신기
AndroidManifest.xml에 방송 수신기에 등록 된 응용 프로그램으로 개발하는 방송 의도를받을 수 있습니다. 우리는 시스템에서 생성 ACTION_BOOT_COMPLETED 이벤트를 모니터링 할 수 MyReceiver을 등록 할 가정하자. 안드로이드 시스템에 의해 시작 프로세스가 완료되면이 이벤트가 발행됩니다.
<application
   android:icon="@drawable/ic_launcher"
   android:label="@string/app_name"
   android:theme="@style/AppTheme" >
   <receiver android:name="MyReceiver">

      <intent-filter>
         <action android:name="android.intent.action.BOOT_COMPLETED">
         </action>
      </intent-filter>

   </receiver>
</application>
안드로이드 장치가 활성화 될 때마다 지금, 인터셉터가 방송된다 수신기 MyReceiver 및 onReceive ()는 논리가 실행됩니다 구현했습니다.
클래스 의도 static 정수 값으로 정의하는 시스템에 의해 생성 된 다양한 이벤트가있다. 다음 표는 중요한 시스템 이벤트를 보여줍니다.
| 이벤트 상수 | 기술 |
|---|---|
| android.intent.action.BATTERY_CHANGED | 충전 레벨 및 기타 정보의 배터리 상태를 포함 내구성 방송. |
| android.intent.action.BATTERY_LOW | 배터리 부족 상태 식별 장치. |
| android.intent.action.BATTERY_OKAY | 배터리 전력이 낮 식별, 지금 좋았다된다. |
| android.intent.action.BOOT_COMPLETED | 시스템 후 다시 방송 부팅이 완료되었습니다. |
| android.intent.action.BUG_REPORT | 보고서 표시 버그 활동. |
| android.intent.action.CALL | 누군가가 지정된 데이터를 수행하기 위해 호출합니다. |
| android.intent.action.CALL_BUTTON | 사용자는 전화 걸기 또는 다른 적절한 인터페이스 다이얼을 엽니 다 '통화'버튼을 클릭합니다. |
| android.intent.action.DATE_CHANGED | 날짜 변경됩니다. |
| android.intent.action.REBOOT | 장치를 다시 시작. |
사용자 정의 방송 의도
당신이 당신의 응용 프로그램이 사용자의 의도를 생성하고 보내려면, 당신은 () 만들고 sendBroadcast를 통해 수업 활동에서 이러한 의도를 전달해야합니다. 당신이 sendStickyBroadcast를 사용하는 경우 (의도) 방법은 방송 종료 후 발행 의도가 유지되었다는 것을 의미하는 영구 (스티커) 될 것입니다.
public void broadcastIntent(View view)
{
   Intent intent = new Intent();
   intent.setAction("cn.uprogrammer.CUSTOM_INTENT");
   sendBroadcast(intent);
}
우리가 같은 등록 시스템을 생산하기 전에 의도로 cn.uprogrammer.CUSTOM_INTENT의 의도는 등록됩니다.
<application
   android:icon="@drawable/ic_launcher"
   android:label="@string/app_name"
   android:theme="@style/AppTheme" >
   <receiver android:name="MyReceiver">

      <intent-filter>
         <action android:name="cn.uprogrammer.CUSTOM_INTENT">
         </action>
      </intent-filter>

   </receiver>
</application>
예
이 예에서는 사용자의 의도를 차단하기위한 방송 수신기를 만드는 방법을 설명합니다. 사용자 지정 목적에 익숙하면 시스템에 의해 생성 된 의도를 차단하도록 응용 프로그램을 프로그래밍 할 수 있습니다. 우리가 만든 안드로이드 응용 프로그램 안녕하세요 예 섹션을 수정하려면 다음 단계를 수행 할 수 있습니다.
| 단계 | 기술 |
|---|---|
| (1) | 안드로이드 응용 프로그램과 이름 브로드 캐스트 리시버를 만드는 안드로이드 Studio를 사용하여 cn.uprogrammer.broadcastreceiver 패키지 안녕하세요 세계 예제 장 아래에 위치. |
| 이 | 파일을 수정하는 주요 활동은 broadcastIntent () 메소드를 추가 MainActivity.java. |
| 3 | 방송 수신기를 정의 할 수 cn.uprogrammer.broadcastreceiver 패키지에 MyReceiver.java라는 이름의 새로운 자바 파일을 만듭니다. |
| 4 | 응용 프로그램은 임의의 제한없이 상기 시스템의 하나 이상의 의도 또는 관례를 처리 할 수있다. 당신이 금지하려는 각 의도의 AndroidManifest.xml에 등록 된 <수신기 ... /> 태그를 사용해야합니다. |
| (5) | 입술 / 레이아웃 / activity_main.xml 파일이 의도 버튼을 방송 할 기본 내용을 포함하는 수정합니다. |
| 6 | 당신은 안드로이드 스튜디오주의 string.xml 파일을 지불 할 문자열 파일을 수정할 필요가 없습니다. |
| (7) | 응용 프로그램을 실행하고 응용 프로그램에 대한 변경의 결과를 확인하기 위해 안드로이드 에뮬레이터를 실행합니다. |
여기서 개질 주요 활동 파일 SRC / cn.uprogrammer.broadcastreceiver / MainActivity.java의 내용이다. 이 파일은 기본 라이프 사이클 접근 방식을 각각 포함되어 있습니다. 우리는 사용자 정의 이벤트를 브로드 캐스트 broadcastIntent () 메소드를 추가했습니다.
package cn.uprogrammer.broadcastreceiver;

import android.os.Bundle;
import android.app.Activity;
import android.view.Menu;
import android.content.Intent;
import android.view.View;

public class MainActivity extends Activity {

    @Override
    public void onCreate(Bundle savedInstanceState) {
        super.onCreate(savedInstanceState);
        setContentView(R.layout.activity_main);
    }

    @Override
    public boolean onCreateOptionsMenu(Menu menu) {
        getMenuInflater().inflate(R.menu.menu_main, menu);
        return true;
    }

    // 广播自定义意图
    public void broadcastIntent(View view){
        Intent intent = new Intent();
        intent.setAction("cn.programmer.CUSTOM_INTENT");
        sendBroadcast(intent);
    }
}
여기에 무엇 SRC / cn.uprogrammer.broadcastreceiver / MyReceiver.java의이다 :
package cn.uprogrammer.broadcastreceiver;

import android.content.BroadcastReceiver;
import android.content.Context;
import android.content.Intent;
import android.widget.Toast;

public class MyReceiver extends BroadcastReceiver {
    @Override
    public void onReceive(Context context, Intent intent) {
        Toast.makeText(context, "检测到意图。", Toast.LENGTH_LONG).show();
    }
}
다음의 AndroidManifest.xml 파일을 수정합니다. 여기에 <수신기 ... /> 태그를 추가하여 우리의 방송 수신기를 포함합니다 :
<?xml version="1.0" encoding="utf-8"?>
<manifest xmlns:android="http://schemas.android.com/apk/res/android"
    package="cn.uprogrammer.broadcastreceiver"
    android:versionCode="1"
    android:versionName="1.0" >

    <uses-sdk
        android:minSdkVersion="8"
        android:targetSdkVersion="22" />

    <application
        android:icon="@drawable/ic_launcher"
        android:label="@string/app_name"
        android:theme="@style/AppTheme" >

        <activity
            android:name=".MainActivity"
            android:label="@string/title_activity_main" >

            <intent-filter>
                <action android:name="android.intent.action.MAIN" />
                <category android:name="android.intent.category.LAUNCHER"/>
            </intent-filter>

        </activity>

        <receiver android:name="MyReceiver">

            <intent-filter>
                <action android:name="cn.programmer.CUSTOM_INTENT">
                </action>
            </intent-filter>

        </receiver>

    </application>

</manifest>
여기에 방송 의도 사용자 지정 버튼을 포함하여 고해상도 / 레이아웃 / activity_main.xml 파일의 내용이다.
<RelativeLayout xmlns:android="http://schemas.android.com/apk/res/android"
    xmlns:tools="http://schemas.android.com/tools" android:layout_width="match_parent"
    android:layout_height="match_parent" android:paddingLeft="@dimen/activity_horizontal_margin"
    android:paddingRight="@dimen/activity_horizontal_margin"
    android:paddingTop="@dimen/activity_vertical_margin"
    android:paddingBottom="@dimen/activity_vertical_margin" tools:context=".MainActivity">

    <TextView
        android:id="@+id/textView1"
        android:layout_width="wrap_content"
        android:layout_height="wrap_content"
        android:text="广播实例"
        android:layout_alignParentTop="true"
        android:layout_centerHorizontal="true"
        android:textSize="30dp" />

    <TextView
        android:id="@+id/textView2"
        android:layout_width="wrap_content"
        android:layout_height="wrap_content"
        android:text="www.uprogrammer.cn"
        android:textColor="#ff87ff09"
        android:textSize="30dp"
        android:layout_above="@+id/imageButton"
        android:layout_centerHorizontal="true"
        android:layout_marginBottom="40dp" />

    <ImageButton
        android:layout_width="wrap_content"
        android:layout_height="wrap_content"
        android:id="@+id/imageButton"
        android:src="@drawable/ic_launcher"
        android:layout_centerVertical="true"
        android:layout_centerHorizontal="true" />

    <Button
        android:layout_width="wrap_content"
        android:layout_height="wrap_content"
        android:id="@+id/button2"
        android:text="广播意图"
        android:onClick="broadcastIntent"
        android:layout_below="@+id/imageButton"
        android:layout_centerHorizontal="true" />

</RelativeLayout>
여기에 입술 / 값 / strings.xml의 파일의 내용은 두 가지 새로운 상수를 정의합니다.
<?xml version="1.0" encoding="utf-8"?>
<resources>
<string name="app_name">Android Broadcast Receiver</string>
<string name="action_settings">Settings</string>
<string name="menu_settings">Settings</string>
<string name="title_activity_main">Main Activity</string>
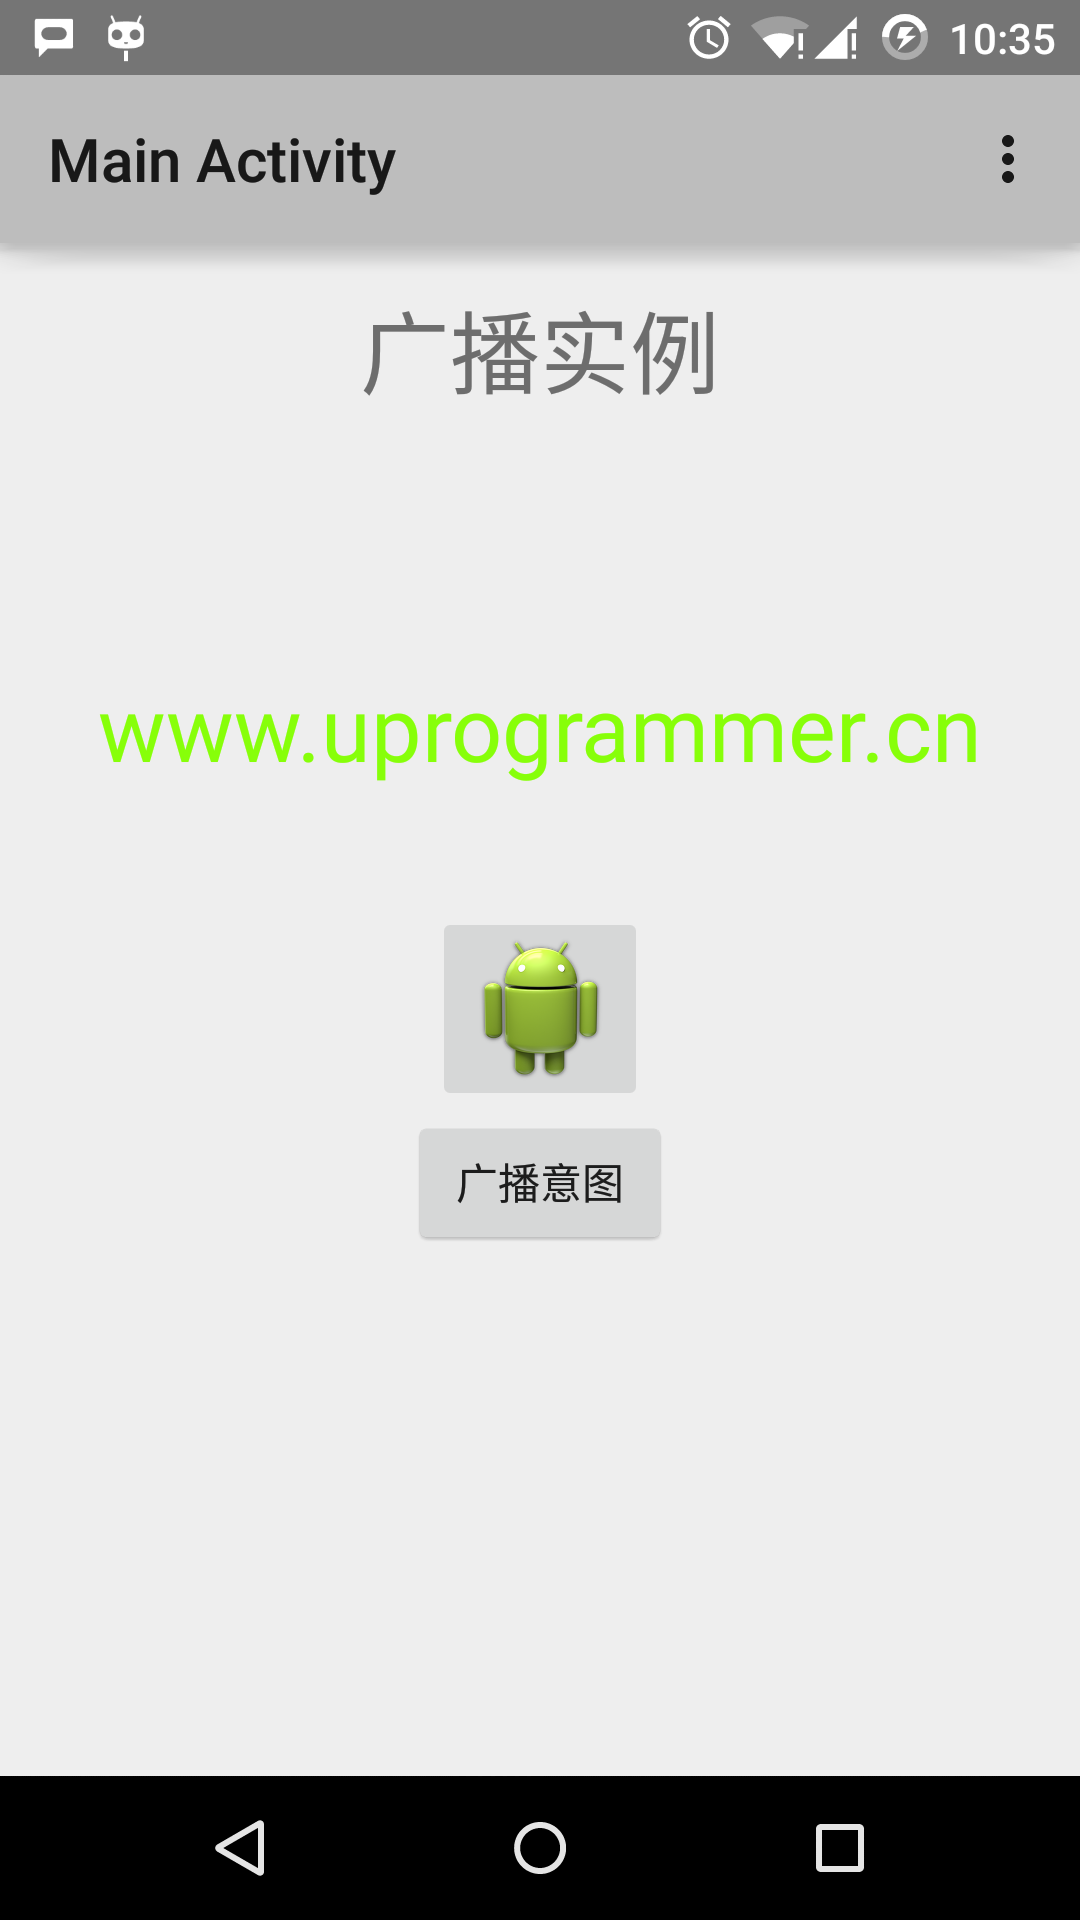
</resources> 그냥 수정 안녕하세요! 응용 프로그램을 실행할 수 있습니다. 난 당신이 설치 환경 동안 AVD를 만든 가정합니다. 활성 파일에서 프로젝트를 열고 도구 모음에서 클릭  아이콘은 안드로이드 Studio에서 응용 프로그램을 실행합니다. 안드로이드 Studio는 AVD에 응용 프로그램을 설치하고 시작합니다. 모두가 잘된다면 다음과 같이, 그것은 에뮬레이터 창에 표시됩니다 :
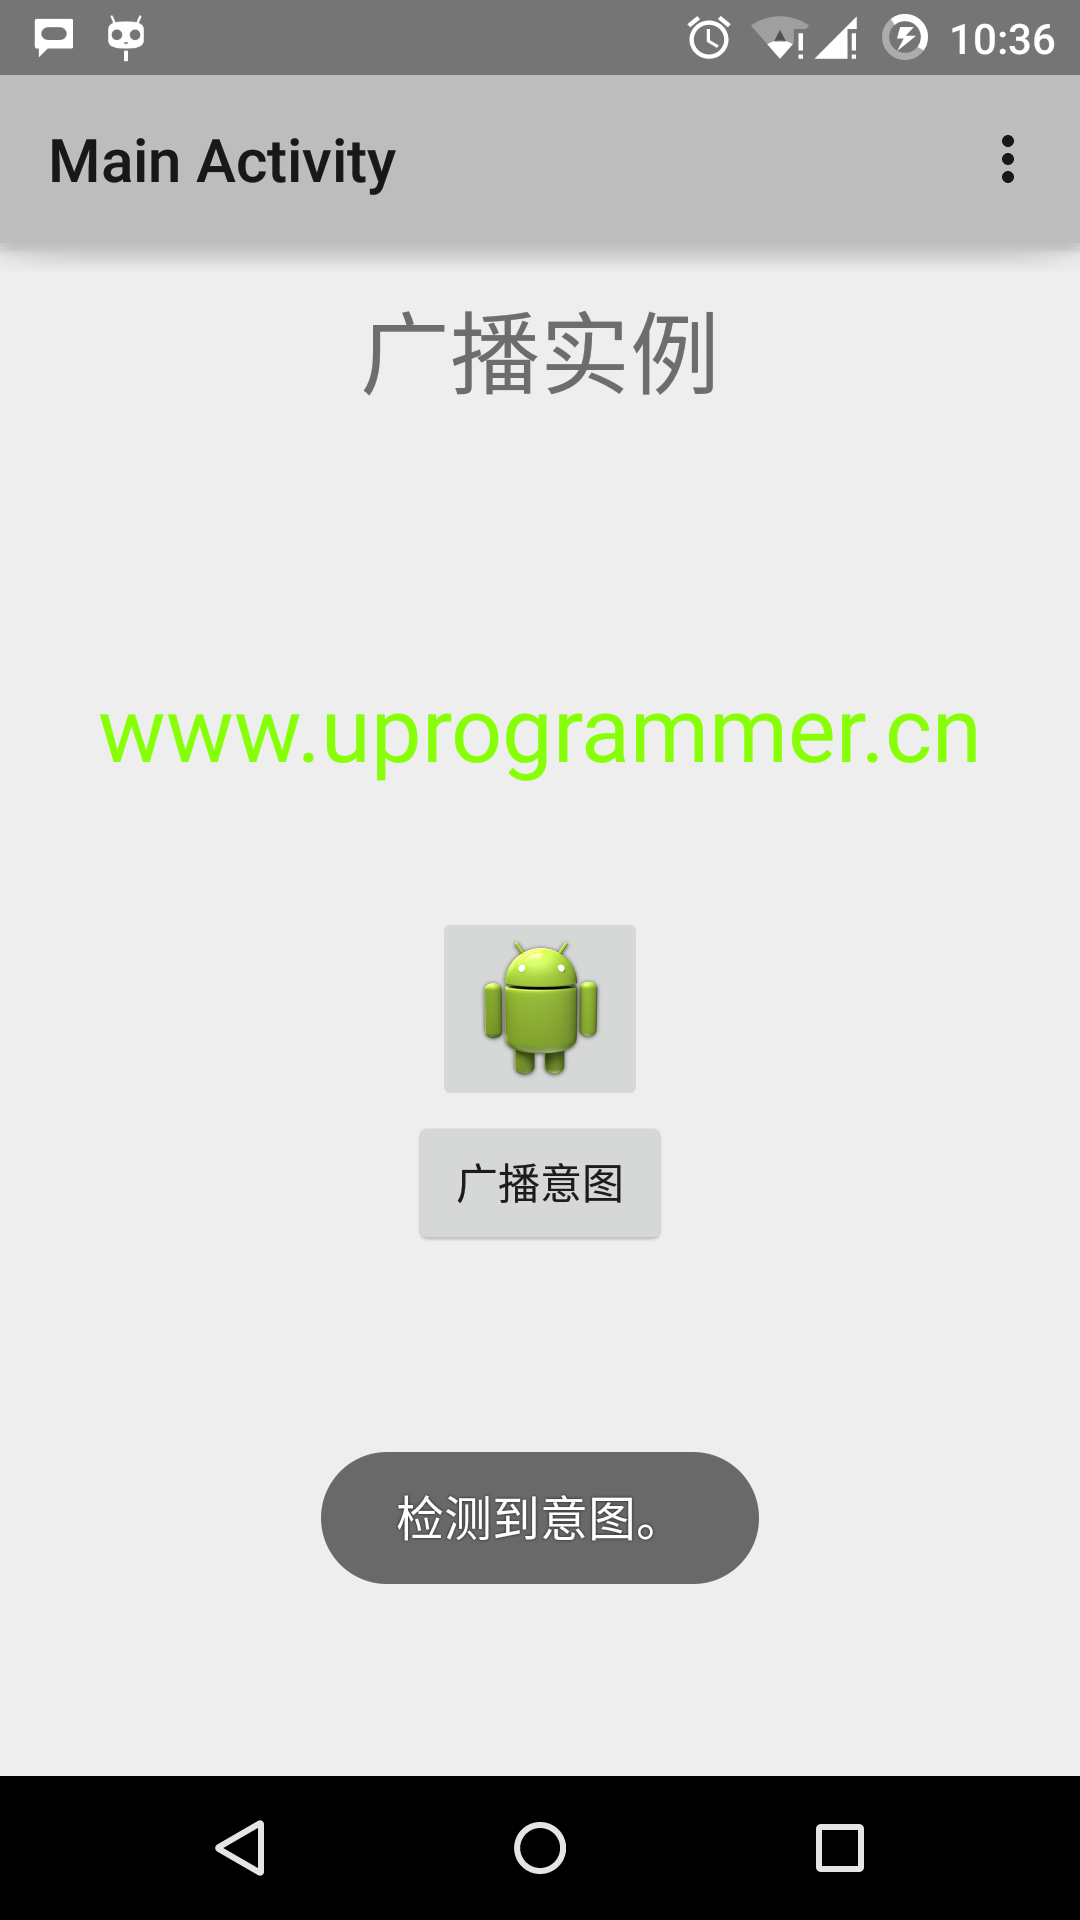
이제 우리의 정의의 의도를 방송 "방송 의도"버튼을 클릭합니다. 그것은 차단하고 우리의 논리에 등록 된 우리의 방송 수신기 MyReceiver에서 구현 실행, 우리의 사용자 의도 "cn.programmer.CUSTOM_INTENT"를 방송한다. 토스트는 시뮬레이터의 맨 아래에 표시됩니다. 다음과 같습니다 :
사용자는 시스템 시작 날짜 변경 및 낮은 전력 소모 등의 시스템에 의해 생성 된 목적을 차단하는 다른 방송 수신기를 구현하려고 할 수있다.