JSP File Upload
JSP can be used with HTML form tags, to allow users to upload files to the server. Uploaded files can be a text or image file, or any documents.
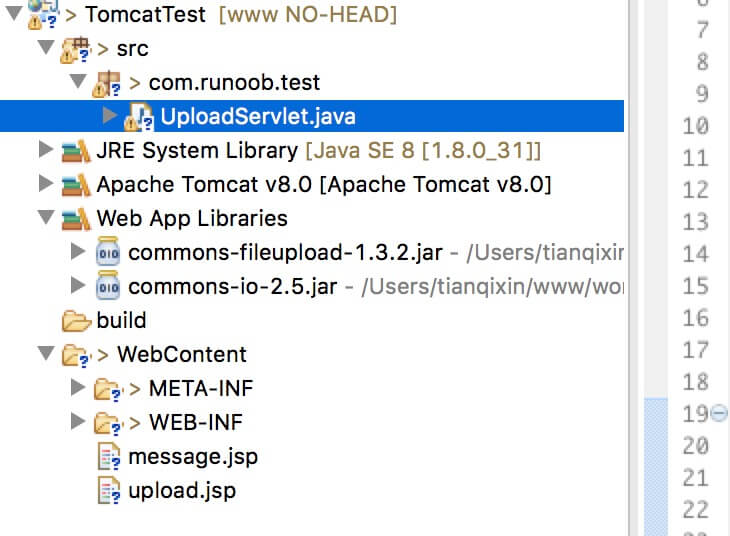
This section we use Servlet to handle file uploads files used are:
- upload.jsp: file upload form.
- message.jsp: Upload successful jump page.
- UploadServlet.java: upload process Servlet.
- Need to introduce jar files: commons-fileupload-1.3.2, commons-io-2.5.jar.
The structure is shown below:
Next we detail.
Create a file upload form
The following HTML code creates a file upload form. The following points should be noted:
- Formmethod property should be set to the POSTmethod, you can not use the GET method.
- Formenctype attribute should be set to multipart / form-data.
- Formaction attribute should be set on the back-end server to handle file uploads Servlet files.The following example usesUploadServlet Servlet to upload files.
- Upload a single file, you should use with a single attribute type = "file" of the <input ... /> tag. In order to allow multiple file uploads, include a plurality of different input values attribute name tag. Enter a label having a value different name attribute. The browser is a Browse button associated with each input label.
upload.jsp file code is as follows:
<%@ page language="java" contentType="text/html; charset=UTF-8"
    pageEncoding="UTF-8"%>
<!DOCTYPE html PUBLIC "-//W3C//DTD HTML 4.01 Transitional//EN"
    "http://www.w3.org/TR/html4/loose.dtd">
<html>
<head>
<meta http-equiv="Content-Type" content="text/html; charset=UTF-8">
<title>文件上传实例 - 本教程</title>
</head>
<body>
<h1>文件上传实例 - 本教程</h1>
<form method="post" action="/TomcatTest/UploadServlet" enctype="multipart/form-data">
	选择一个文件:
	<input type="file" name="uploadFile" />
	<br/><br/>
	<input type="submit" value="上传" />
</form>
</body>
</html>
Prepare background Servlet
The following is UploadServlet source code to deal with the same file upload, before that we rely on to make sure the package has been introduced to the next WEB-INF / lib directory of the project:
- The following examples are dependent on the FileUpload, so make sure to have the latest version of thecommons-fileupload.xxjar file in your classpath.From http://commons.apache.org/proper/commons-fileupload/ download.
- FileUpload dependent on Commons IO, so make sure to have the latest version of thecommons-io-xxjar file in your classpath.From http://commons.apache.org/proper/commons-io/ download.
You can directly download site provides two dependencies:
UploadServlet source code is as follows:
package com.w3big.test;

import java.io.File;
import java.io.IOException;
import java.io.PrintWriter;
import java.util.List;

import javax.servlet.ServletException;
import javax.servlet.annotation.WebServlet;
import javax.servlet.http.HttpServlet;
import javax.servlet.http.HttpServletRequest;
import javax.servlet.http.HttpServletResponse;

import org.apache.commons.fileupload.FileItem;
import org.apache.commons.fileupload.disk.DiskFileItemFactory;
import org.apache.commons.fileupload.servlet.ServletFileUpload;


/**
 * Servlet implementation class UploadServlet
 */
@WebServlet("/UploadServlet")
public class UploadServlet extends HttpServlet {
    private static final long serialVersionUID = 1L;

    // 上传文件存储目录
    private static final String UPLOAD_DIRECTORY = "upload";

    // 上传配置
    private static final int MEMORY_THRESHOLD   = 1024 * 1024 * 3;  // 3MB
    private static final int MAX_FILE_SIZE      = 1024 * 1024 * 40; // 40MB
    private static final int MAX_REQUEST_SIZE   = 1024 * 1024 * 50; // 50MB

    /**
     * 上传数据及保存文件
     */
    protected void doPost(HttpServletRequest request,
		HttpServletResponse response) throws ServletException, IOException {
		// 检测是否为多媒体上传
		if (!ServletFileUpload.isMultipartContent(request)) {
		    // 如果不是则停止
		    PrintWriter writer = response.getWriter();
		    writer.println("Error: 表单必须包含 enctype=multipart/form-data");
		    writer.flush();
		    return;
		}

        // 配置上传参数
        DiskFileItemFactory factory = new DiskFileItemFactory();
        // 设置内存临界值 - 超过后将产生临时文件并存储于临时目录中
        factory.setSizeThreshold(MEMORY_THRESHOLD);
        // 设置临时存储目录
        factory.setRepository(new File(System.getProperty("java.io.tmpdir")));

        ServletFileUpload upload = new ServletFileUpload(factory);

        // 设置最大文件上传值
        upload.setFileSizeMax(MAX_FILE_SIZE);

        // 设置最大请求值 (包含文件和表单数据)
        upload.setSizeMax(MAX_REQUEST_SIZE);

        // 构造临时路径来存储上传的文件
        // 这个路径相对当前应用的目录
        String uploadPath = getServletContext().getRealPath("./") + File.separator + UPLOAD_DIRECTORY;


        // 如果目录不存在则创建
        File uploadDir = new File(uploadPath);
        if (!uploadDir.exists()) {
            uploadDir.mkdir();
        }

        try {
            // 解析请求的内容提取文件数据
            @SuppressWarnings("unchecked")
            List<FileItem> formItems = upload.parseRequest(request);

            if (formItems != null && formItems.size() > 0) {
                // 迭代表单数据
                for (FileItem item : formItems) {
                    // 处理不在表单中的字段
                    if (!item.isFormField()) {
                        String fileName = new File(item.getName()).getName();
                        String filePath = uploadPath + File.separator + fileName;
                        File storeFile = new File(filePath);
                        // 在控制台输出文件的上传路径
                        System.out.println(filePath);
                        // 保存文件到硬盘
                        item.write(storeFile);
                        request.setAttribute("message",
                            "文件上传成功!");
                    }
                }
            }
        } catch (Exception ex) {
            request.setAttribute("message",
                    "错误信息: " + ex.getMessage());
        }
        // 跳转到 message.jsp
        getServletContext().getRequestDispatcher("/message.jsp").forward(
                request, response);
    }
}
message.jsp file code is as follows:
<%@ page language="java" contentType="text/html; charset=UTF-8"
    pageEncoding="UTF-8"%>
<!DOCTYPE html PUBLIC "-//W3C//DTD HTML 4.01 Transitional//EN"
    "http://www.w3.org/TR/html4/loose.dtd">
<html>
<head>
<meta http-equiv="Content-Type" content="text/html; charset=UTF-8">
<title>文件上传结果</title>
</head>
<body>
    <center>
        <h2>${message}</h2>
    </center>
</body>
</html>
Compile and run Servlet
Compile the previous Servlet UploadServlet, and create the required entry in the web.xml file, as follows:
<?xml version="1.0" encoding="UTF-8"?>
<web-app xmlns:xsi="http://www.w3.org/2001/XMLSchema-instance"
    xmlns="http://java.sun.com/xml/ns/javaee"
    xmlns:web="http://java.sun.com/xml/ns/javaee/web-app_2_5.xsd"
    xsi:schemaLocation="http://java.sun.com/xml/ns/javaee
        http://java.sun.com/xml/ns/javaee/web-app_2_5.xsd"
    id="WebApp_ID" version="2.5">
  <servlet>
    <display-name>UploadServlet</display-name>
    <servlet-name>UploadServlet</servlet-name>
    <servlet-class>com.w3big.test.UploadServlet</servlet-class>
  </servlet>

  <servlet-mapping>
    <servlet-name>UploadServlet</servlet-name>
    <url-pattern>/TomcatTest/UploadServlet</url-pattern>
  </servlet-mapping>
</web-app>
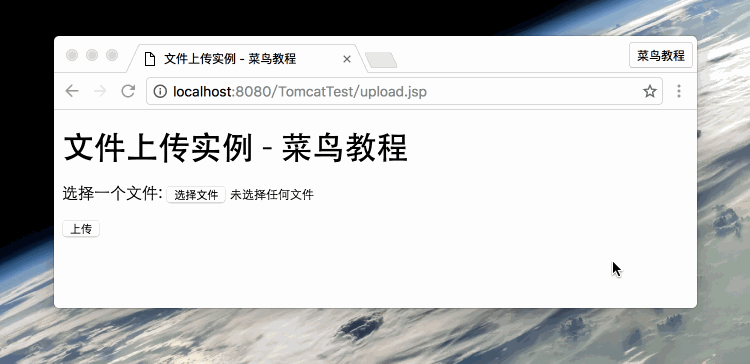
Now try using an HTML form that you created above to upload files. When you visit in your browser: http: // localhost: 8080 / TomcatTest / upload.jsp, presentation as follows: