jQuery EasyUI Data Grid - Creating Subdivisions
Details view uses the data grid (datagrid), the user can expand the row to display additional details. Any content can be loaded as a detail row, sub-grid also can be dynamically loaded. This tutorial will show you how to create a sub-grid on the main grid.
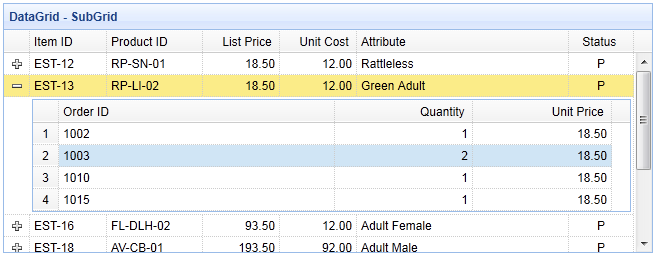
Step 1: Create the main grid
<Table id = "dg" style = "width: 700px; height: 250px"
		url = "datagrid22_getdata.php"
		title = "DataGrid - SubGrid"
		singleSelect = "true" fitColumns = "true">
	<Thead>
		<Tr>
			<Th field = "itemid" width = "80"> Item ID </ th>
			<Th field = "productid" width = "100"> Product ID </ th>
			<Th field = "listprice" align = "right" width = "80"> List Price </ th>
			<Th field = "unitcost" align = "right" width = "80"> Unit Cost </ th>
			<Th field = "attr1" width = "220"> Attribute </ th>
			<Th field = "status" width = "60" align = "center"> Status </ th>
		</ Tr>
	</ Thead>
</ Table>
Step 2: Set to show a detailed view of Subdivisions
In order to use a detailed view, please remember to refer to a view script file in the page header.
<Script type = "text / javascript" src = "http://www.w3cschool.cc/try/jeasyui/datagrid-detailview.js"> </ script>
$ ( '# Dg'). Datagrid ({
	view: detailview,
	detailFormatter: function (index, row) {
		return '<div style = "padding: 2px"> <table class = "ddv"> </ table> </ div>';
	},
	onExpandRow: function (index, row) {
		var ddv = $ (this) .datagrid ( 'getRowDetail', index) .find ( 'table.ddv');
		ddv.datagrid ({
			url: 'datagrid22_getdetail.php itemid =?' + row.itemid,
			fitColumns: true,
			singleSelect: true,
			rownumbers: true,
			loadMsg: '',
			height: 'auto',
			columns: [[
				{Field: 'orderid', title: 'Order ID', width: 100},
				{Field: 'quantity', title: 'Quantity', width: 100},
				{Field: 'unitprice', title: 'Unit Price', width: 100}
			]],
			onResize: function () {
				$ ( '# Dg') datagrid ( 'fixDetailRowHeight', index).;
			},
			onLoadSuccess: function () {
				setTimeout (function () {
					$ ( '# Dg') datagrid ( 'fixDetailRowHeight', index).;
				}, 0);
			}
		});
		$ ( '# Dg') datagrid ( 'fixDetailRowHeight', index).;
	}
});
When the user clicks the expand button ( '+'), 'onExpandRow' event will be triggered. We create a new grid with three subnets. When the sub-mesh data when loaded successfully or change the size, please remember to call the main grid 'fixDetailRowHeight' method.
Step 3: The server-side code
datagrid22_getdata.php
$ Result = array ();

include 'conn.php';

$ Rs = mysql_query ( "select * from item where itemid in (select itemid from lineitem)");

$ Items = array ();
while ($ row = mysql_fetch_object ($ rs)) {
	array_push ($ items, $ row);
}

echo json_encode ($ items);
datagrid22_getdetail.php
include 'conn.php';

$ Itemid = mysql_real_escape_string ($ _ REQUEST [ 'itemid']);

$ Rs = mysql_query ( "select * from lineitem where itemid = '$ itemid'");
$ Items = array ();
while ($ row = mysql_fetch_object ($ rs)) {
	array_push ($ items, $ row);
}
echo json_encode ($ items);